• Skip to primary navigation
  • Skip to main content
  • Skip to primary sidebar
  • About
    • Contact
    • Disclaimer
    • Privacy Policy
    • Terms & Conditions
  • FAQ
  • Vegan Recipes
    • Free Fridge Food
    • Special Diets
      • Anti-Inflammatory
      • Gluten-Free
    • Type of Meal
      • Breakfast
      • Lunch
      • Dinner
      • Snacks
    • Culturally-Inspired
      • Argentinean-Inspired
      • Chinese-Inspired
        • Dim Sum
          • 12 Months of Dim Sum
        • Noodles
      • Filipino Food
      • Italian-Inspired
      • Japanese-Inspired
      • Korean-Inspired
      • Malaysian-Inspired
      • Mexican-Inspired
      • Neapolitan-Inspired
      • Pacific Northwest
      • Russian-Inspired
    • Baking
      • Bars
      • Breads
      • Cakes
      • Cookies
    • Holiday Recipes
      • Christmas
      • Friendsgiving
    • Season
      • Autumn
      • Winter
    • Condiments
  • SHOP
    • My Pantry Favorites
  • 12 Months of Dim Sum

Bakeroise

Vegan Filipino Afritada Inspired Tomato Stew

Mulled Pear and Apple Cider

Bakery Style Chocolate Chip Cookies

Shortcut Vegan Bolognese

Kimchi Chickpea Bowl

Hearty Kale and Chickpea Tomato Soup

Vegan Upside Down Pear Cake with Crushed Candy Caps

Golden Beets and Brown Rice Bowl

Vegan Longevity Noodles – Yī Miàn

Farewell, 2021. Hello, 2022!

12 Months of Dim Sum Project 2021

Fennel Cake with Lingonberry Sauce

Argentinian-Inspired Chimichurri

March 19, 2021

Affiliate Disclosure: As an Amazon Associate, I earn from qualifying purchases. Thank you for supporting Bakeroise.

Hola! Today I bring you an Argentinean-inspired chimichurri recipe. It’s ridiculously easy, simple to make and only has to sit for an hour for the flavors to marry. Everyone I know loves this chimichurri recipe and I hope you do too.

I first tried Argentinian chimichurri about a decade ago when my partner swept me off to a month-long trip to Buenos Aires for my birthday. We spent that whole month eating our way through the city trying as many different foods as possible. Oh was it an exciting time! Vegetarianism, let alone veganism, wasn’t on my radar at the time so I fully indulged in all the goods from choripan and asados to helado de dulce de leche and medialunas.

My favorite thing, however, wasn’t a dish or even a dessert. It was chimichurri!

Argentinian chimichurri is a naturally vegan condiment that is used liberally throughout Argentina, Paraguay and Uruguay, the countries next door. It is traditionally made with loads of parsley, oregano, garlic, chili peppers, red wine vinegar, salt and olive oil. It is generally used as a topping for meat and as a sauce for empanadas. Nowadays my favorite way to use it is in my vegan burgers and, of course, vegan empanadas.

Despite chimichurri containing pepper flakes, it isn’t meant to be spicy at all. After all, spicy food was just something that never caught on down there. That’s not surprising since most of the Argentine population are white people whose families emigrated from European countries like Italy, Spain and Germany – all countries with cuisines that don’t have an emphasis on spicy food. I’m a little confused though because this blog says that chimichurri is traditionally very hot so … if anyone can enlighten me, please do! Then again, maybe I’m just centering myself and thinking from the perspective of someone with a rather high heat tolerance and perhaps chimichurri might actually be “spicy” to other people. Hmm.

Speaking of their food culture and history, the origins of chimichurri are actually a little muddled so I’m going to straight up let you do your own research and decide what you want to go with! I did my own research of course but as a first-generation Filipina-American whose parents come from the Philippines, a country that was under colonial rule, I always feel weird when there’s some kind of narrative that something possibly started because of a white person when there were actually a bunch of indigenous people around. Even if said white person was there to fight with and for the indigenous group. Jim McCurry ring a bell? Chimichurri? Jim McCurry? And we don’t even know if it’s true so I don’t really want to spread misinformation on this blog.

I digress. I like a little bit of spice so here we are. I know, I know. I’m changing things. Remember, this is an inspired recipe that’s meant for me and other people who love heat! And at least I’m not putting cilantro in it even though I love it! That’s a straight up different herb. So there.

This recipe is adapted from Karina’s chimichurri recipe at Cafe DeLites. I chose her recipe because her chimichurri is the one that most strongly resembles the kind we had in Buenos Aires. I wanted the small-but-big-enough chunks of each ingredient and I appreciated that she chops her ingredients with a knife instead of a food processor. I don’t want to puree my chimichurri and in general I don’t like these kind of condiments (think salsa) to be blended. I want thick chunks of what makes it good.

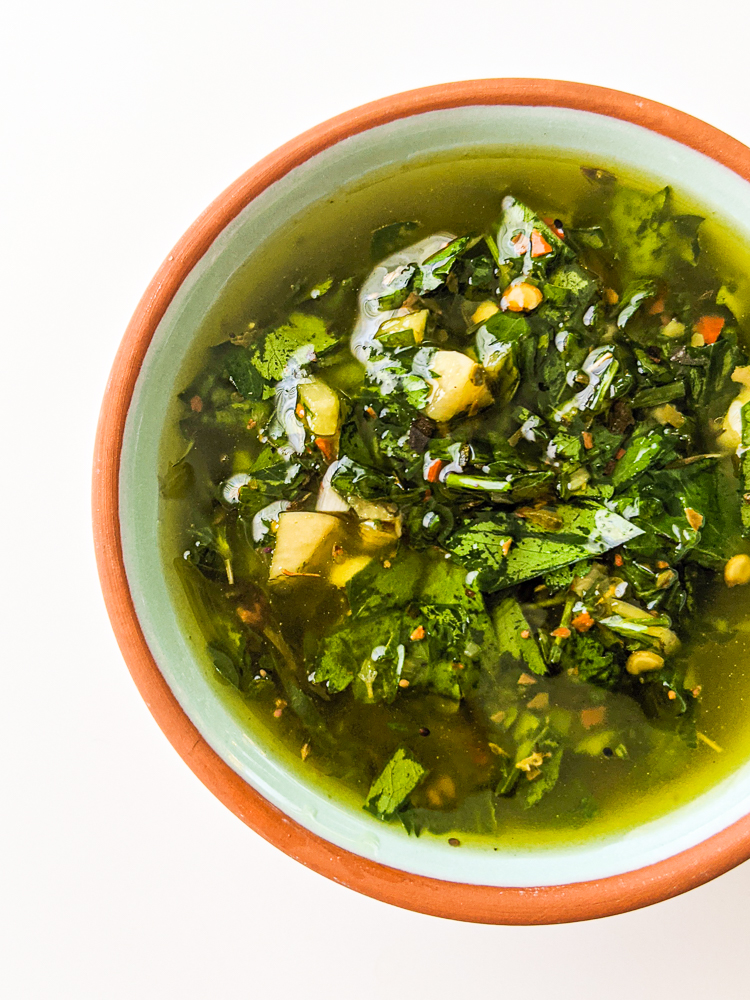
The ingredients I used for this Argentinean-inspired chimichurri were good olive oil, red wine vinegar, two bunches of parsley, garlic, red chili pepper flakes, dried oregano, salt and freshly ground black pepper to taste. My recipe also yields a higher amount because chimichurri never lasts long in our house.

While Argentinean chimichurri is traditionally made with aji molido flakes from Argentina, I opted to use the regular ol’ red chili pepper flakes which pack way more heat. The flakes are made of different peppers, including cayenne, and are also mixed with the dried pepper seeds which makes it more spicy. So obviously the function the pepper flakes serve in this recipe isn’t necessarily for flavor but for heat.

This Argentinean-inspired chimichurri is pretty easy to make. Just rinse and dry the preferably organic parsley (since we’re not cooking it). Then remove the leaves from the parsley which is super easy and takes a few minutes just by lightly pinching around the stem and sliding it down to remove the leaves. Then roughly chop the parley leaves as little as you’d like along with the garlic. Then put all the ingredients together in a bowl and let sit for an hour, covered. Then boom! You’ve got yourself chimichurri that’s ready to be used and eaten.

Feel free to adjust the quantities of things according to your preference. All spice levels are different so I wouldn’t be surprised if my own recipe was too spicy or not spicy enough for some people. Play around with it! Make it yours.

If you use this Argentinean-inspired chimichurri recipe, let me know! Hope you enjoy.

Print

Argentinian-Inspired Chimichurri

Print Recipe

This is recipe is for Argentinean-inspired chimichurri. It’s inspired because it has more heat than traditional chimichurri!

  • Author: Jan Carlisle @ Bakeroise
  • Prep Time: 20-30 minutes
  • Total Time: 20-30 minutes
  • Category: Condiment
  • Cuisine: Argentinean
  • Diet: Vegan

Ingredients

Scale
  • 2 bunches of parsley, leaves finely chopped
  • 4 cups good olive oil
  • 3 tablespoons of water
  • 8 cloves garlic, finely chopped or minced
  • 4 tablespoons red wine vinegar
  • 1 tablespoon red chili pepper flakes
  • 1 tablespoon dried oregano
  • Salt to taste – I use at least four palmfuls. 
  • Ground black pepper to taste 

Instructions

  1. Mix all of the ingredients together and let sit for one hour for the flavors to marry.

Equipment

Image of Shun 8-inch Chef's Knife

Shun 8-inch Chef’s Knife

Buy Now →
Image of mixing bowls

mixing bowls

Buy Now →

Notes

  1. Adjust ratios as needed to fit your needs.
  2. Bring to room temperature before serving. 
  3. Storage: 3-4 weeks in the fridge

Did you make this recipe?

Share a photo and tag us — we can’t wait to see what you’ve made!

Adobong Puti – Filipino Adobo Without Soy Sauce

March 8, 2021

Affiliate Disclosure: As an Amazon Associate, I earn from qualifying purchases. Thank you for supporting Bakeroise.

Hi! I am back with a recipe for vegan Filipino adobo without soy sauce called Adobong Puti. This Adobong Puti dish is rich with garlic and gingery flavors, easy to make and only requires nine ingredients. It’s called “Adobong Puti” which translates to “white adobo”. While my first vegan Filipino Adobo recipe requires soy sauce, this recipe doesn’t.

As we already know, Filipino adobo is both an indigenous dish and an indigenous cooking method. The salt, instead of soy sauce, was the original way to make adobo. The soy sauce was added later on when Chinese traders came to the Philippines influenced the dish. The soy sauce version is called “Adobong Itim” which translates to “black adobo”.

This adobong puti recipe was adapted from my aunt’s own adobong puti recipe and her adobo was my favorite growing up.

This simple adobong puti recipe does have complex flavors. I had to make this dish five or six times to get the ratios right and I pretty much had to abandon my aunt’s directions because they were too meat-centered. I felt kind of bad about that but using soy curls instead of meat just changes everything. The rules are just so different and I can’t afford to follow the “don’t use too much oil” instruction when soy curls don’t render any fat at all.

In this vegan Filipino adobo without soy sauce recipe for adobong puti, I use a whole head of garlic just like in my other recipe but even more ginger (peeling optional) and vinegar in this final version. I use about two tablespoons of salt during the cooking process and when serving, I salt my white rice to taste. This is another dish where it’s important to salt to taste.

In my vegan Filipino adobo for adobong itim recipe, I had to be careful to not break up the tofu too much and there wasn’t any real browning that wasn’t soy-sauce induced. In this dish, I get to be more free about stirring, folding and tossing the soy curls since they’re way more sturdy.

Because this is a more simple vegan Filipino adobe recipe, I’m not providing a step-by-step with pictures in this narrative. But this is basically it: The aromatics are cooked in the oil for a minute or two. Then we incorporate the soy curls and then we pretty much cook everything at a rolling boil for 20-25 minutes until the liquid is mostly cooked down and the soy curls are browned – not burned.

Because this is a pretty vinegary dish, I’d just watch out for fumes while cooking. The finished dish is perfect and quite vinegary but everyone who has tried this dish unanimously enjoys it. This includes non-Filipinos who aren’t used to eating this kind of stuff. And by this stuff, I mean pretty vinegary, obviously gingery, super garlicky soy curls with whole peppercorns to boot.

So I hope you like this dish too! If you use my recipe, please try to follow it to a tee and let me know what you think!

Print

Filipino Adobo Without Soy Sauce – Adobong Puti Recipe

Print Recipe

This is an easy vegan Filipino recipe for the original method of making adobo using salt instead of soy sauce.

  • Author: Jan Carlisle @ Bakeroise

Ingredients

Scale
  • 16 oz of dehydrated soy curls
  • 2 cups of oil
  • 2 tablespoons of salt, divided
  • 3” chunk ginger, unpeeled, rinsed and roughly chopped – about 33 grams
  • 1 whole head of garlic, each clove peeled and roughly chopped
  • ¼ cup of peppercorn
  • 3 dried bay leaves
  • 3 cups of white distilled vinegar
  • 3 cups of water
  • Salt to taste

Instructions

  1. Bring a large pot of the oil to medium-high heat.
  2. When oil is hot, add ginger, garlic, dried bay leaves, peppercorns and sprinkle with one tablespoon of salt. Stir to mix evenly and cook for about 1-2 minutes. Make sure not to brown.
  3. Add the soy curls and stir so that the oil and aromatics cover each soy curl as much as possible.
  4. Add the remaining tablespoon of salt, water and vinegar. Stir to mix and then bring to a boil and cook on for 20-25 minutes at a rolling boil until about 90% of the liquid is cooked down.
  5. The next 5 minutes is mostly stirring to avoid sticking while still browning. Fold in the soy curls so that everything is evenly brown. Stir until most of the soy curls are still full, moist but evenly brown. Do not burn.

Did you make this recipe?

Share a photo and tag us — we can’t wait to see what you’ve made!

Research:

Philippine adobo Wikipedia page: https://en.wikipedia.org/wiki/Philippine_adobo

Instant Pot Congee

March 3, 2021

Affiliate Disclosure: As an Amazon Associate, I earn from qualifying purchases. Thank you for supporting Bakeroise.

Hello! I finally completed the February dim sum dish recipe for my 12 Months of Dim Sum Project. Man, that crappy week in mid-February really set me back because it’s March now! In January, I shared my Vegan Siomai recipe and now I am sharing with you my Instant Pot Vegan Congee Recipe. Congee is also known as “Jook”.

I’ve always called this dish Congee based on my experiences in the Philippines and Hong Kong but almost everyone else I know here in the states calls congee specifically Jook or Zhōu. There are also so many regional versions of this dish that I can’t list here and keep this narrative at a reasonable length. But, of course, I have to mention there is indeed a Filipino version called “lugaw” and that it is, of course, the version of congee I ate the most growing up.

When Eloise was a baby (or maybe when I was heavily pregnant?), I ordered an Instant Pot but was so overwhelmed that I never unboxed it. I felt awful and so intimidated just even looking at the box that I eventually sent it back for a refund. Then the summer after that, a box was delivered to my house. I opened it and saw what was inside and gasped, “Oh…no!!!!”

The Instant Pot was back. A couple of good friends from Oakland had pitched in and sent me one for my birthday as a surprise. They hadn’t known that I’d already purchased it before and sent it back. Or maybe they did and wanted to push me into doing something I wanted to do? They were always encouraging.

Like before I was scared to use it. I think it took at least a month until finally I gathered the courage to actually sit down and learn how to use it. Once I got to the hang of it, it became my favorite method of cooking. Man, I’m a busy lady! This was awesome and I can’t thank my friends enough for essentially making me face my fears at a time when I felt like I could barely function.

This vegan congee recipe is ridiculous easy and convenient as it’s made in the Instant Pot and releases steam naturally. So it really is one of those “set it and forget it” type of meals. Gosh, I hope that isn’t a protected tagline. This is also a dish you can make days in advance and reheat just by adding water to your desired consistency and, of course, seasoning to taste.

Congee is a Chinese rice porridge dish that can be bland or incredibly rich with various flavors depending on what you add. Many people also tend to eat congee they are sick. Like how many Americans eat chicken soup. I’m American too but, obviously, I like congee more. I also think it’s easier to eat because of its thicker consistency.

However, Congee isn’t only a dish for when people are sick. It is also served as a breakfast dish at dim sum, usually with youtiao (Chinese donut).

For this vegan congee, we are using a very small amount of ingredients: Garlic and ginger for the aromatics, mushroom for umami flavor and, my favorite, Jasmine rice. Glutinous rice can be used for this dish as well but as you know from my Vegan Champorado without Glutinous Rice Recipe, I love my Jasmine rice! Seasoning could be either salt or soy sauce.

As for the consistency of the congee, I like it to be watery at first because it thickens so quickly. So the ratio of rice to water in cups I use is 1:10.

For ease and less compost, the ginger ends up being rinsed well and then diced without peeling. Correct, no peeling. Simple right? The garlic is also only peeled and roughly chopped. Both aromatics are cooked for two minutes at the most before the mushrooms are added for another two minutes of cooking. Then, quickly after that, the rice is mixed in and coated with the garlic ginger oil before everything is mixed and “finally” cooking in the Instant Pot on porridge mode.

The prep and start of the cooking process is that quick. Now we just wait about an hour. It takes about 15-20 minutes for the pressure to build, 20 minutes for the vegan congee to cook in porridge mode and, finally, up to half an hour for the steam to release naturally before removing the lid and serving.

I also have optional add-ins written in the recipe that transform the dish from a simple congee to a flavor-packed bowl of rich and silky goodness. So while the vegan congee is cooking, I prepare my toppings towards the end. Again, this is optional.

This time I chose cilantro and chili oil but I also use scallions or Chinese chives at other times.

Look at that thick and savory dish! I think I got a little excited when taking this photo as you can see! I barely combined this dish in my bowl because I wanted bursts of flavor.

It was perfect for me.

This is a pretty versatile dish so anyone can omit the ingredients they don’t want on that specific day and add whatever they’d like. Like I stated above, I’d just nix everything except for the rice, water and maybe a tiny bit of salt if I were under the weather.

Hope you enjoy this recipe and find this vegan congee as delicious and comforting as I do.

12 Months of Dim Sum Recipes:

January 2021: Vegan Siomai

February 2021: Instant Pot Congee

March 2021: Vegan Potstickers with Ginger Scallion Tofu

April 2021: Crispy Golden Fried Tofu

May 2021: Toasted Cumin Scallion Pancakes

June 2021: Gluten-Free Asian Dipping Sauce

July 2021: Sweet Red Bean Paste and Perfectly Golden Sesame Balls

Print

Instant Pot Vegan Congee

Print Recipe

The easiest and most convenient Instant Pot vegan congee recipe you’ll ever need! It is soothing and rich with garlic and gingery flavor and the perfect dish when you’re feeling under the weather, having breakfast or just plain craving good, comforting food. 

  • Author: Jan Carlisle @ Bakeroise
  • Prep Time: 5
  • Cook Time: 70
  • Total Time: 75
  • Yield: 8 servings 1x

Ingredients

Scale
  • Peanut oil or neutral oil with a high smoke point like vegetable oil
  • 5 cloves of garlic, roughly chopped
  • 28 grams of rinsed, unpeeled ginger, diced
  • 10 ounces of frozen shiitake mushrooms
  • 1 teaspoon of salt
  • 1 cup of rice, rinsed
  • 10 cups of water
  • More salt (or soy sauce) to taste
  • Optional for topping: Chinese chili oil, cilantro, sliced scallions

Instructions

  1. Turn on the Instant Pot and select the saute option at “Normal” level. There is a light indicator for it and you use the plus and minus signs to choose the level of intensity.
  2. Lightly over the bottom of the pot in oil. When the oil is hot, add the ginger and garlic and cook for 1-2 minutes or until aromatic. Do not brown.
  3. Add the mushrooms and salt and combine well with the garlic ginger oil. Cook for another 2-3 minutes until mushrooms have softened up. Turn off the Instant pot by pressing cancel.
  4. Add the rice and stir to mix the grains to try and coat each grain with the oil as much as possible. You’ll hear a slight frying sound. Add the water and mix everything evenly.
  5. Make sure the silicone round seal is attached to the lid’s inner edge. Cover and seal the Instant Pot with the lid. Set the steam release handle on “Sealing”.
  6. Turn on Instant Pot by pressing the “Porridge” button and make sure the cooking time is 20 minutes at “normal” intensity. You can adjust this by using the plus and minus signs. It will take 15-20 minutes to build pressure before it actually starts to cook. So this step will take up to 40 minutes.
  7. When done, let the pressure of the Instant Pot release naturally. So do not adjust the steam release handle at all. The natural release takes up to 30 minutes. (See notes)
  8. When the steam is released, you’ll notice that the silver pressure indicator has sunk into its little socket. That means it is safe to remove the lid.
  9. Season to taste using salt or soy sauce. This will vary between each person and each situation. Trust your taste buds. This can be a bland dish if you want it to be for when you’re sick.
  10. Serve in bowls and, optional, top with cilantro leaves and/or sliced green onions.

Equipment

Image of Instant Pot

Instant Pot

Buy Now →
Image of Shun 8-inch Chef's Knife

Shun 8-inch Chef’s Knife

Buy Now →

Notes

  • Do not peel your ginger if you don’t want to. I personally prefer to keep my skin on nowadays. Peel if you feel like it. Not a big deal either way.
  • If you’re sick and want something bland, omit everything except the salt and water at first. Then season to your taste only if you think you can handle it. I personally couldn’t.
  • Absolutely don’t do a manual release when the food is done. If you do, starchy water will spray out from the pot and get everywhere. It won’t be a fun cleanup.

Keywords: vegan congee, dim sum, vegan dim sum, vegan rice porridge, vegan jook, vegan porridge, comfort food, vegan comfort food

Did you make this recipe?

Share a photo and tag us — we can’t wait to see what you’ve made!

Vegan Lemon Bars with Silken Tofu

February 26, 2021

Affiliate Disclosure: As an Amazon Associate, I earn from qualifying purchases. Thank you for supporting Bakeroise.

Today I bring you these 7-Ingredient Vegan Lemon Bars which are honestly too easy to make! They also set way faster then many lemon bar recipes out there due to the drained and pureed extra firm silken tofu. If you want something more challenging and/or less sweet, you can try my vegan Spanish bread recipe instead. If you still have a sweet tooth but don’t have as much time, try my vegan compost cookies recipe.

On our first Valentine’s Day in 2011, my boyfriend and I made each other’s favorite desserts in his tiny apartment kitchen. He made me brownies and I made him lemon bars. Now that I’ve been on a vegan diet for over half a decade, it’s time to finally have a tailored vegan lemon bar recipe for our kitchen.

I looked at various recipes for today’s post because I can’t find the old recipe that I used to use. I think it was one on allrecipes but nothing on there today looks familiar. I found this recipe from Preppy Kitchen that isn’t vegan but looked promising.

I tried his recipe while trying to make as few changes as possible and, as usual of course, I wasn’t successful on the first try. It was clearly a good omni recipe so I just had to make this multiple times until I got it right. A lot of tweaking was in order for the version I needed.

Aside from the obvious changes, like using organic sugar instead of conventional and using vegan butter instead of dairy butter, there were other things that I needed to change not only from his recipe but also from my initial baking tests to get the results I wanted. Here are the top 3 takeaways:

  • Using a baking pan instead of baking dish is way easier. In Preppy Kitchen’s recipe, he did use a baking pan but both the narrative and recipe called for a baking dish. To me a baking dish is usually the glass casserole ones. I ended up having to purchase a nonstick baking pan because the rounded corners of the glass baking dish didn’t give me the hard, right angled corners that I wanted. Using parchment paper in round-cornered glass baking dishes when baking bars tends to be awkward for me.
  • Using drained extra firm silken tofu instead of any undrained, random firmness silken tofu is better for this recipe. The regular silken tofu filling didn’t set at all, even after refrigerating overnight. It wasn’t until I finally tried the extra firm silken tofu and draining it before pureeing it that I found success.
  • Moving the lemon zesting and juicing from the prep stage to the shortbread baking stage saves so much time. I found during my earlier tests that zesting and juicing as made the recipe take way longer. In many recipes, I’ve found that trying to do all the prep work at the beginning when some of that stuff could be done during the inactive cooking times is honestly a literal waste of time…time that I can’t afford to lose because, well, hello I’m busy.

So to make the lemon bars, we must absolutely have extra firm silken tofu. Non-gmo tofu products are available in the US and non-gmo soybeans are grown in the US.

That’s a fact.

I used two boxes of these Mori-Nu ones:

I drained the silken tofu in between two plates with the weight of a tortilla press on top. Spoiler: it doesn’t drain much liquid but still good to do.

While that was going on, I also melted my vegan butter. Then I weighed out other ingredients like the flour, sugar and the salt, which I sifted into the mixing bowl of the stand mixer.

When the butter is melted, pour the butter into the mixing bowl with the sifted ingredients. You will mix it all up and get a nice crumby mixture that will be your crust. Then you put the mixture into the baking pan. Oh, by the way, don’t wash or discard the mixing bowl as we’ll be using it for our filling.

My kiddo then flattened it as much as she could to make the crust. Then we put it in the oven to bake at 350 for 26 minutes, rotating 180 degrees halfway.

While the crust baked, I zested half of the lemons and juiced all six afterwards. For this, I prefer to use my hand-held lemon squeezer as opposed to a reamer. Much easier. Also don’t try juicing the lemons first as trying to get zest form juiced lemons would suck.

After we sifted the remaining flour into the mixing bowl from earlier, we then processed the lemon zest and the cane sugar to make a lemon zest sugar. Oh my, this is when it starts to smell good. This newly formed lemon zest sugar is then mixed with the remaining flour in the mixer.

I then take our drained, extra firm silken tofu and process it into a puree.

I then added the puree, vegan egg and lemon juice to the mixing bowl with the flour and lemon zest sugar and stir until it is mixed and looks like this:

Then I poured it into my greased and then parchment-lined baking pan. I didn’t realize my parchment paper was placed so unevenly until I saw this picture. Yikes!

Then into the oven it goes for 26 minutes, rotating halfway through for even cooking. After 26 minutes, I removed it and let it chill on a wire cooling rack for an hour. It was surprisingly firm after only an hour but to be sure, I always chill an extra hour in the fridge.

This is after a combined total of two hours cooling time. I was able to lift one side about 45 degrees and the filling stayed put. It was ready to cut and serve.

This recipe makes 8 large bars, 16 medium bars, 32 small bars and 64 bite-size pieces. I generally don’t like to sprinkle the powdered sugar until serving because it does dissolve and the last thing I want to do is add even more sugar to an already sweet dish.

This recipe has (finally!) been a hit so far with family and friends. It took a few tries and quite a few tweaks but this final end result is worth it.

Here is my 7-Ingredient Vegan Lemon Bars Recipe with Silken Tofu, adapted from Preppy Kitchen

Print

7-Ingredient Vegan Lemon Bars with Silken Tofu

Print Recipe

These 7-ingredient vegan lemon bars have a decadent lemon filling made out of extra firm silken tofu that is packed with sweet, citrus flavors.

  • Author: Jan Carlisle @ Bakeroise
  • Prep Time: 25
  • Cook Time: 26
  • Total Time: 51 minutes + 2 hours set time
  • Category: Dessert
  • Method: Baking
  • Cuisine: American
  • Diet: Vegan

Ingredients

Scale
  • Oil for greasing the baking pan. I just used avocado oil spray.

Crust:

  • 170 grams of unsalted butter, melted
  • 300 grams of all-purpose flour
  • 42 grams organic powdered sugar,
  • ½ teaspoon salt

Filling:

  • 698 grams of extra firm silken tofu at room temperature, drained
  • 6 lemons
  • 450 grams of organic cane sugar
  • 60 grams of all-purpose flour

Topping:

  • Organic powdered sugar for serving (optional)

Instructions

  1. Preheat the oven to 350°F. Lightly oil a 9×13 baking pan then line with parchment paper. The oil should help the parchment paper stick.
  2. Sift the 300 grams of flour, salt and powdered sugar into the stand mixer’s bowl. Using the whisk attachment, turn the mixer on low and mix the ingredients together for a few seconds.
  3. When the butter is fully melted, pour it into the mixing bowl with the flour mixture. Mix the butter and flour mixture until nice crumbs appear. This should take maybe 15-20 seconds.
  4. Pour the crust mix into the 9×13 baking dish. It will be crumbly. Set aside the unwashed mixing bowl to use again soon. 
  5. Spread the crust mix evenly over the bottom of the baking dish by gently shaking the baking pan back and forth until the crumbs are distributed evenly. Then flatten the crust as evenly as possible. .
  6. Bake the crust in the oven for 30-35 minutes or until it turns lightly golden and slightly crisp. When done, remove the baking pan from oven and set aside to let the crust cool. 
  7. While the crust is baking in the oven, take the 6 lemons and zest three of them. Then juice all six. 
  8. Sift the remaining 60 grams of flour into the mixing bowl from earlier.
  9. Add the lemon zest and sugar to a food processor and pulse several times until combined to create a lemon sugar. When combined, add the newly formed lemon sugar to the sifted flour in the mixing bowl and turn the stand mixer on to mix on low just until combined.
  10. Add the drained silken tofu to the food processor and process for about 15-20 seconds or until it almost turns into a puree. When done, pour the tofu puree into the mixing bowl.
  11. Add the vegan eggs and the lemon juice to the mixing bowl and whisk the ingredients until they turn into a smooth lemon filling. Pour the lemon filling into the baking dish, making sure to evenly distribute.
  12. Bake for 13 minutes. Then carefully and safely rotate the pan 180 degrees.
  13. Bake for another 13 minutes.
  14. When done, the filling shouldn’t be too jiggly, if at all. Move the baking pan to a wire cooling rack to chill for 1 hour. 
  15. After one hour, cover with cling wrap and move the baking pan to the fridge and let chill for another 1 hour or until fully set. 
  16. When set, cut into bars. This can make 8 large bars, 16 medium bars, 32 small bars or even 64 bite-size pieces. 
  17. Using a mini strainer, sprinkle organic powdered sugar on the bars that are ready to serve.

Equipment

Image of mini strainer

mini strainer

Buy Now →
Image of lemon squeezer

lemon squeezer

Buy Now →
Image of 9x13 Baking Pan

9×13 Baking Pan

Buy Now →

parchment paper

Buy Now →

stand mixer

Buy Now →

Notes

  1. This may be sacrilege but I specifically didn’t add the weight of the lemon juice or zest because I tried this recipe multiple times with both medium and large lemons and honestly got very similar flavor. I’m down with weighing my ingredients but honestly, trying to keep this recipe as simple as possible. As long as you aren’t using tiny lemons, you should be good.

Did you make this recipe?

Share a photo and tag us — we can’t wait to see what you’ve made!

  • « Go to Previous Page
  • Page 1
  • Interim pages omitted …
  • Page 11
  • Page 12
  • Page 13
  • Page 14
  • Page 15
  • Page 16
  • Go to Next Page »

Primary Sidebar

Categories

Recent Recipes

  • Vegan Filipino Afritada Inspired Tomato Stew
  • Mulled Pear and Apple Cider
  • Bakery Style Chocolate Chip Cookies
  • Shortcut Vegan Bolognese
  • Kimchi Chickpea Bowl
  • Facebook
  • Twitter
  • Instagram
  • Pinterest

Calendar

June 2025
M T W T F S S
 1
2345678
9101112131415
16171819202122
23242526272829
30  
« Dec    

Archives

  • December 2023
  • November 2023
  • September 2023
  • September 2022
  • March 2022
  • February 2022
  • January 2022
  • December 2021
  • November 2021
  • October 2021
  • September 2021
  • August 2021
  • July 2021
  • June 2021
  • May 2021
  • April 2021
  • March 2021
  • February 2021
  • January 2021

Recent Comments

  • Jan on Vegan Longevity Noodles – Yī Miàn
  • Kim on Vegan Longevity Noodles – Yī Miàn
  • Jan on Vegan Mongolian Beef Inspired Soy Curls
  • Jenn P on Vegan Mongolian Beef Inspired Soy Curls
  • Jan on 10 Ingredient Vegan Siomai

Footer

↑ back to top

About

  • Privacy Policy
  • Disclaimer
  • Terms & Conditions

Newsletter

  • Sign Up! for emails and updates

Contact

  • Contact
  • FAQ

As an Amazon Associate I earn from qualifying purchases.

Copyright © 2020 Brunch Pro on the Brunch Pro Theme