• Skip to primary navigation
  • Skip to main content
  • Skip to primary sidebar
  • About
    • Contact
    • Disclaimer
    • Privacy Policy
    • Terms & Conditions
  • FAQ
  • Vegan Recipes
    • Free Fridge Food
    • Special Diets
      • Anti-Inflammatory
      • Gluten-Free
    • Type of Meal
      • Breakfast
      • Lunch
      • Dinner
      • Snacks
    • Culturally-Inspired
      • Argentinean-Inspired
      • Chinese-Inspired
        • Dim Sum
          • 12 Months of Dim Sum
        • Noodles
      • Filipino Food
      • Italian-Inspired
      • Japanese-Inspired
      • Korean-Inspired
      • Malaysian-Inspired
      • Mexican-Inspired
      • Neapolitan-Inspired
      • Pacific Northwest
      • Russian-Inspired
    • Baking
      • Bars
      • Breads
      • Cakes
      • Cookies
    • Holiday Recipes
      • Christmas
      • Friendsgiving
    • Season
      • Autumn
      • Winter
    • Condiments
  • SHOP
    • My Pantry Favorites
  • 12 Months of Dim Sum

Bakeroise

Vegan Filipino Afritada Inspired Tomato Stew

Mulled Pear and Apple Cider

Bakery Style Chocolate Chip Cookies

Shortcut Vegan Bolognese

Kimchi Chickpea Bowl

Hearty Kale and Chickpea Tomato Soup

Vegan Upside Down Pear Cake with Crushed Candy Caps

Golden Beets and Brown Rice Bowl

Vegan Longevity Noodles – Yī Miàn

Farewell, 2021. Hello, 2022!

12 Months of Dim Sum Project 2021

Fennel Cake with Lingonberry Sauce

Vegan Mongolian Beef Inspired Soy Curls

August 27, 2021

Affiliate Disclosure: As an Amazon Associate, I earn from qualifying purchases. Thank you for supporting Bakeroise.

Vegan Mongolian beef-inspired soy curls with a sprinkle of toasted sesame seeds and Sichuan pepper flakes on top

Hi! Apologies for the unintentional hiatus. After almost a very hectic month of family visits, multiple broken and dying home appliances, a stolen city compost bin, another heat wave and then bad air due to forest fires, I obviously had to prioritize and focusing on getting my ducks in row at home along with our safety obviously won out over everything. But now I’m back with a vegan Mongolian beef inspired soy curls recipe to share! And no, this obviously isn’t a part of my 12 Months of Dim Sum Project. And for full disclosure, this recipe isn’t an attempt for it to be “authentically Taiwanese” but instead trying to somewhat replicate a dish I’ve had for decades, largely because of some of the best memories I had as a kid.

I’ve been eating Mongolian beef since I was a kid at my favorite American Chinese restaurant in Alameda, CA called China House – (RIP!). Despite being fortunate to patronize more “authentic” Chinese restaurants in Oakland’s Chinatown due to our location, we also had humble taste and would eat at different types of eateries – which brought us to our favorite American Chinese restaurant, China House. We went there regularly until my grandfather passed way and my visits to that restaurant became more and more sporadic…until one day I finally upped and moved away – to Portland, my current home for the past decade.

Mongolian beef was the dish that every family member (especially my grandpa and I) could agree was palatable. There was something about the perfectly cooked beef that was coated not-too-sweet and not-too-syrupy sauce paired with steaming white rice that makes it the perfect comfort food. OMG don’t even get me started on how much white rice my family ate. Filipinos, man. But of course now that I’m vegan, I have to share my vegan Mongolian beef inspired soy curls recipe.

This vegan Mongolian beef inspired soy curls recipe centers around soy curls of course and uses less common ingredients like ground Sichuan peppercorn and Sichuan pepper flakes.

It’s a rather simple process. I look over and snap any super long soy curls in half if needed. I try to keep the strips 3-4 inches long. Then I dehydrate the soy curls in a large bowl by covering and soaking them in water for 10 minutes.

While I’m letting the soy curls dehydrate, I gather my ingredients. I use scallions too and cut the white parts into thin slices and the green parts into diagonal 3-inch long strips.

When the soy curls are done rehydrating, I drain them using a large kitchen sieve and let them sit for another few minutes or until I’m done gathering the rest of the ingredients if I hadn’t finished yet.

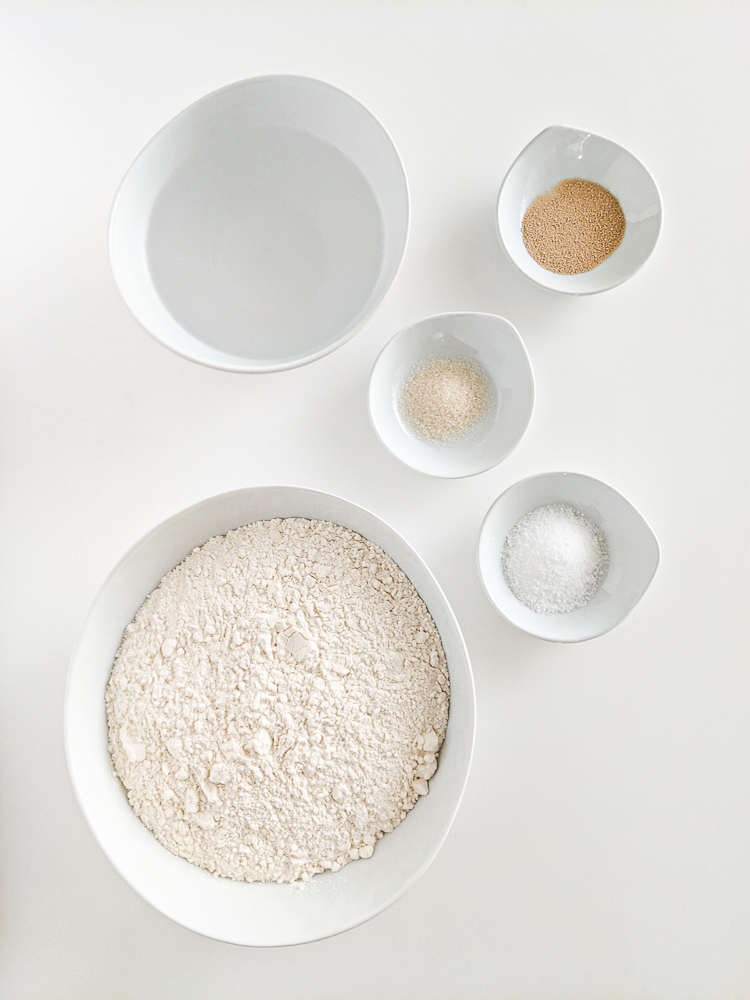
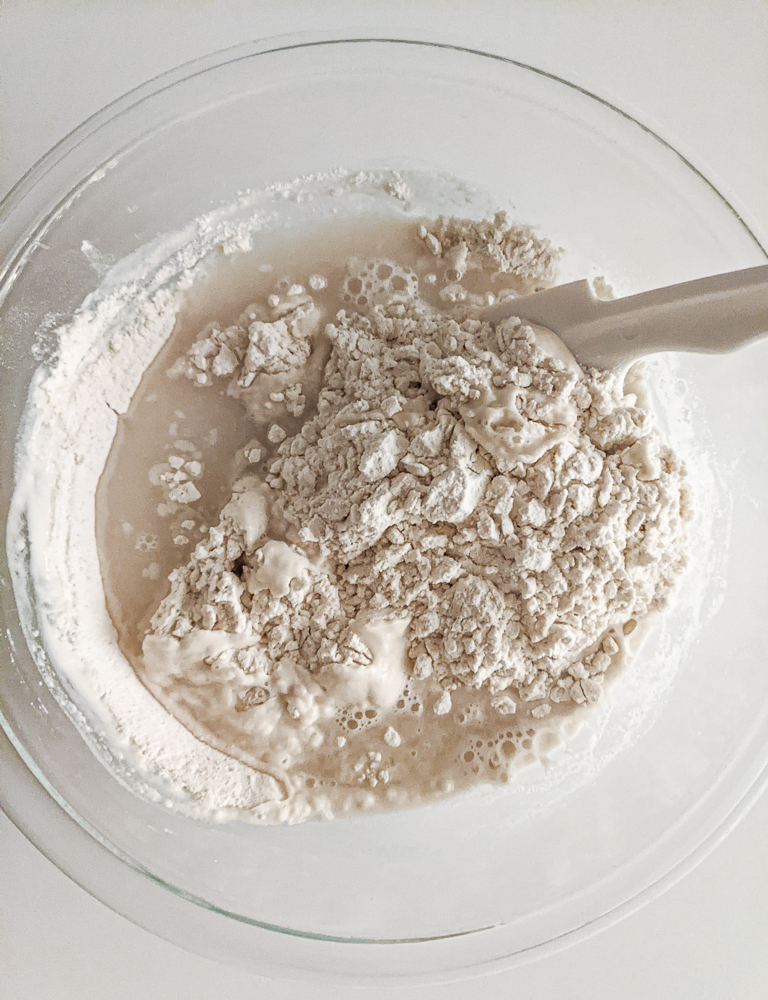
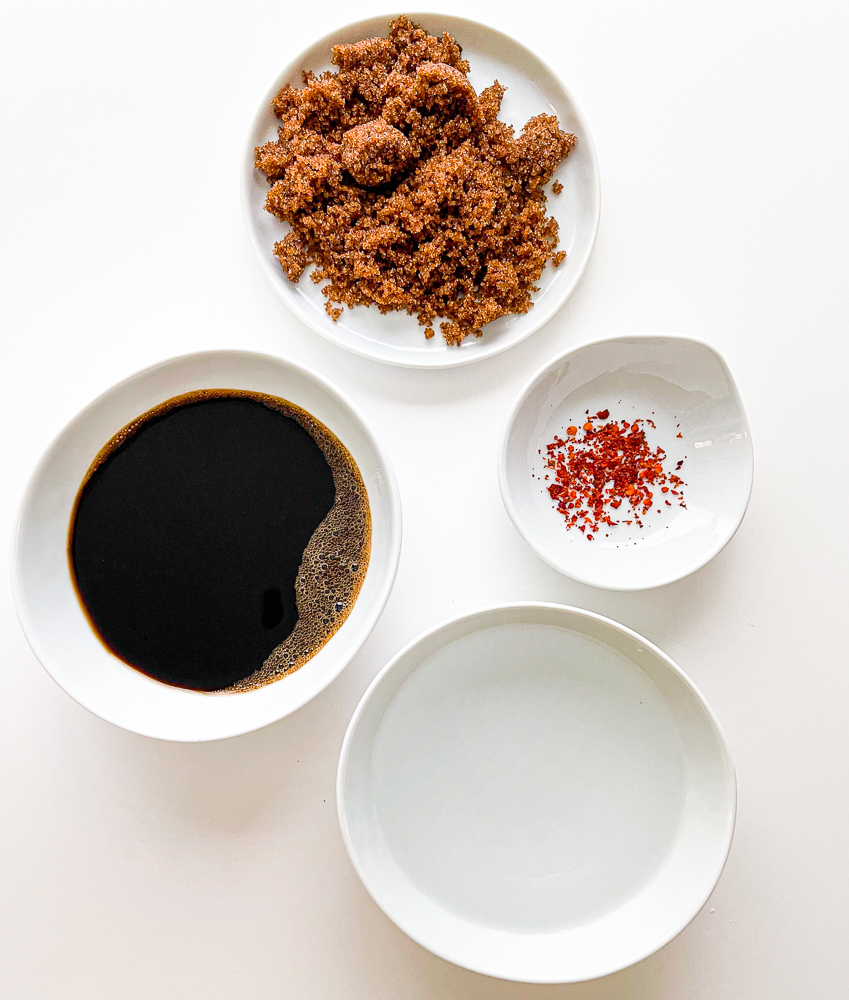
In a medium bowl, I mix together my sauce ingredients: soy sauce, water, brown sugar and Sichuan pepper flakes.

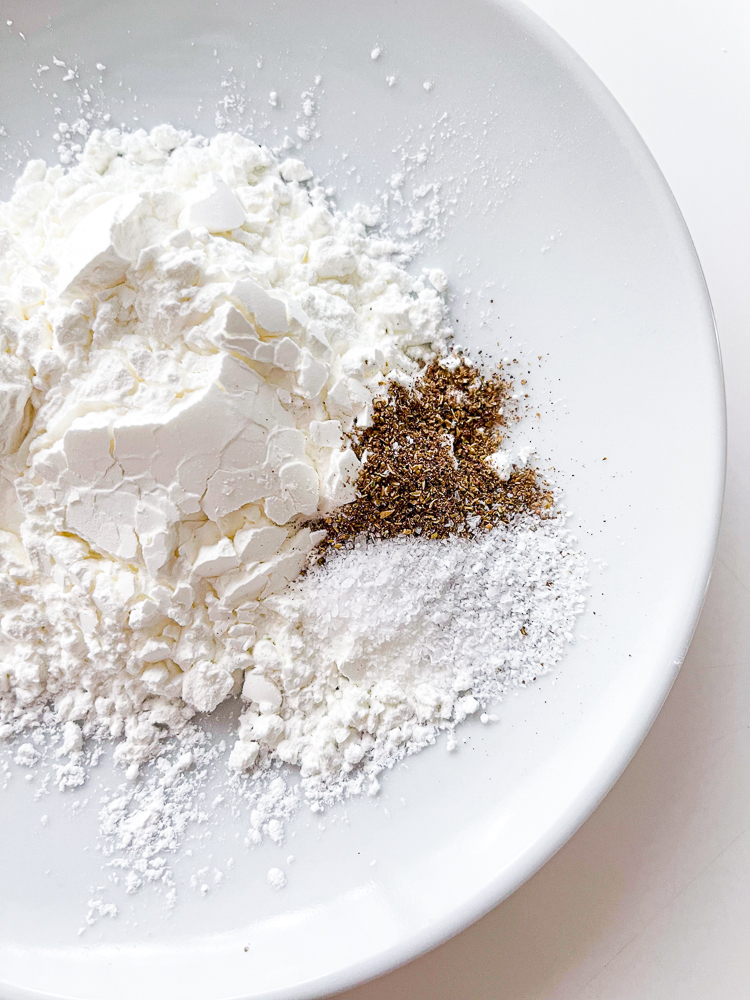
In a small bowl, I mix together my soy curl coating ingredients: cornstarch, kosher salt, ground Sichuan peppercorn.

Then I take my drained soy curls and start drying removing any excess water by wringing them out using a cheesecloth or kitchen towel. I do this to make the cornstarch stick to eachs soy curl better.

To coat them, I put them in food container that’s at least 8 cups in capacity and add cornstarch. I then shake everything and make sure each piece is coated with cornstarch. It’s similar to how I coat my tofu in my crispy golden fried tofu recipe but I can actually afford to take a little more since the soy curls are more sturdy.

We bring a cast iron pan to medium heat and add ¼ cup of vegetable oil. When that is hot, we add our ginger, garlic, and the thinly sliced white parts of the bulb.

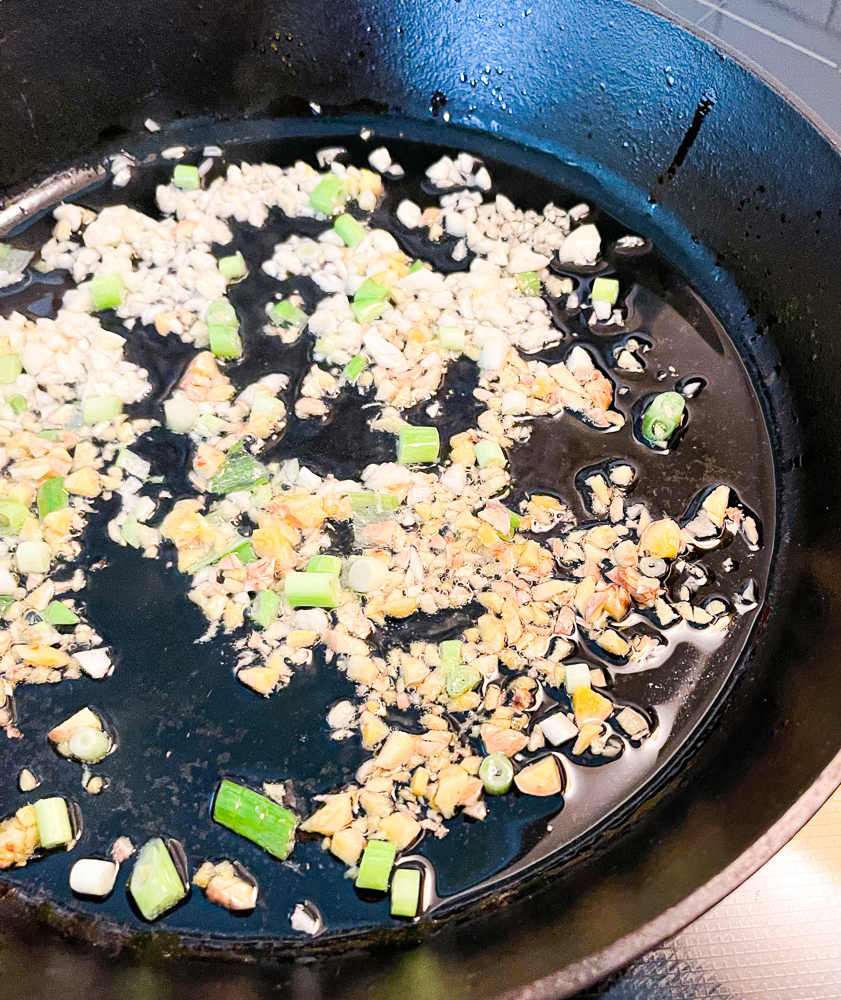
We cook for a few minutes until aromatic and we don’t let anything get brown as we’re still going to cook it with the sauce. When it’s aromatic, we add the sauce and let it cook a thicken.

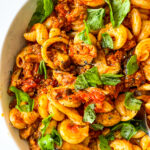
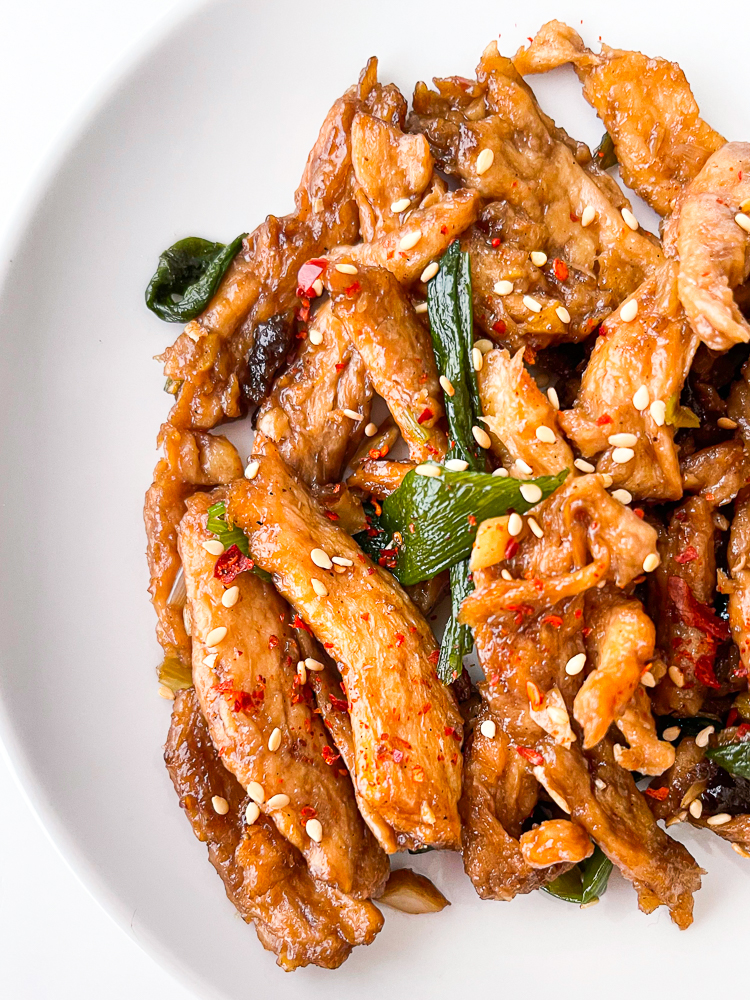
Once the sauce is thicken, we turn up the heat to medium high add our coated soy curls and diagonally cut green onions and cook until each soy curl is coated with the thick sauce for a few minutes. Then we turn the eat back down to medium heat for another few minutes and then we’re done.

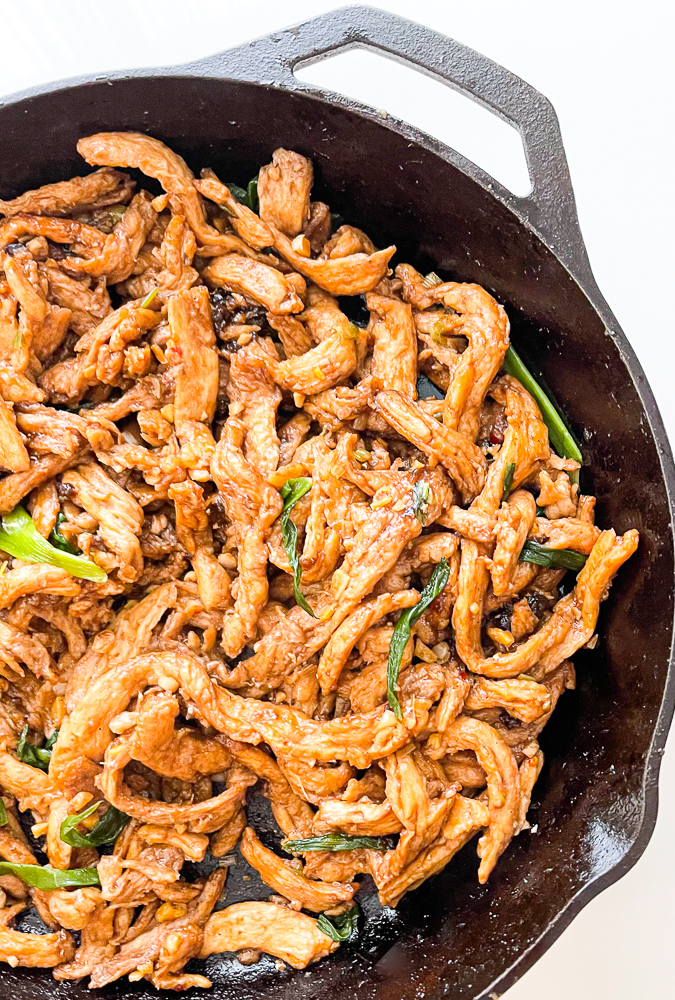
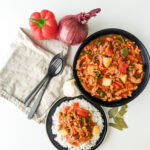
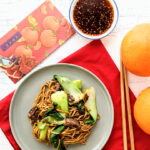
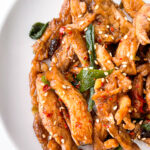
We can add toasted sesame seeds for garnish. I love toasted sesame seeds. Then we serve with rice.

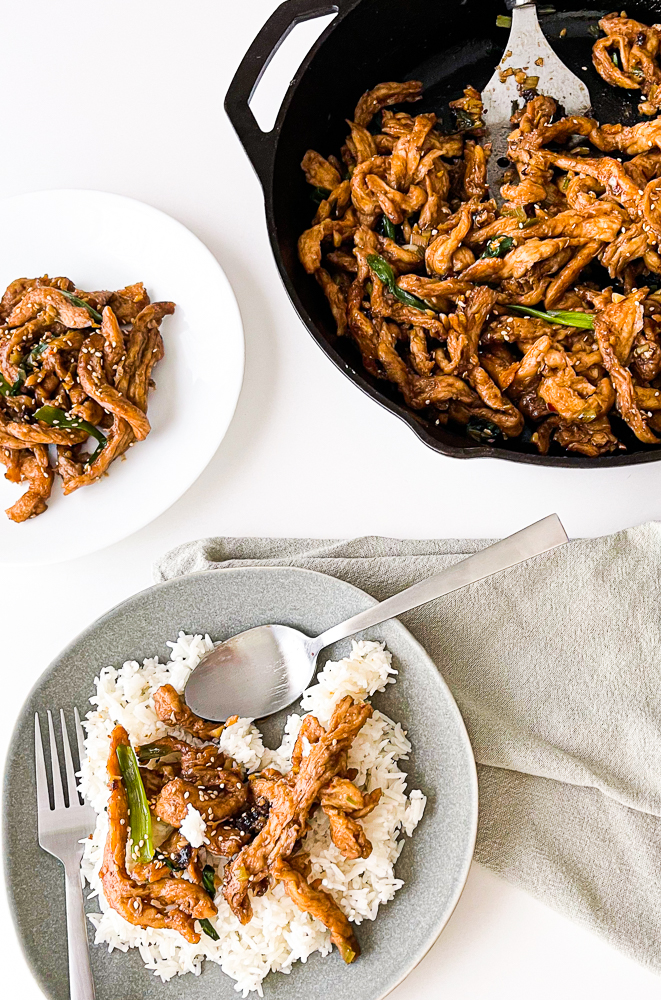
If you want to make it even more colorful, you can add thinly sliced red peppers on top but I like to keep it simple. Hope you enjoy this recipe the way my loved ones do!

Print

Vegan Mongolian Beef Inspired Soy Curls

Print Recipe

★★★★★

5 from 2 reviews

Vegan Mongolian Beef Inspired Soy Curls recipe that takes only 30 minutes to make

  • Author: Jan
  • Prep Time: 15
  • Cook Time: 15
  • Total Time: 30
  • Yield: 4 servings 1x
  • Category: Dinenr
  • Cuisine: Taiwanese
  • Diet: Vegan

Ingredients

Scale
  • 8 ounces of soy curls, snapped in half if more than 4 inches long
  • ¼ cup of vegetable oil
  • 4 cloves of garlic, crushed and roughly chopped
  • 1 inch ginger, unpeeled and roughly chopped 
  • 4 Green onions

Sauce:

  • ½ cup light soy sauce
  • ½ cup water
  • ½ cup dark brown sugar
  • ½ teaspoon sichuan pepper flakes

Coating:

  • 1 teaspoon Sichuan ground peppercorn to taste
  • 1 teaspoon kosher salt to taste
  • ¼ cup cornstarch

Garnish:

  • Toasted sesame seeds for garnish

Instructions

  1. Rehydrate the dehydrated soy curls in a large bowl by covering them with water in a large bowl for 10 minutes. 
  2. While that’s happening, rinse and dry all the vegetables that need rinsing if you haven’t done so and cut the green onions – white parts into thin slices and green parts diagonally into 3-inch long strips.
  3. When the soy curls are done soaking, drain using a large kitchen sieve and let drain while you finish prepping anymore ingredients you didn’t get to do. 
  4. In a medium bowl, mix together the sauce ingredients: the dark brown sugar, light soy sauce, water and Sichuan pepper flakes.
  5. In a small bowl, mix together the coating ingredients: cornstarch, ground Sichuan peppercorn and kosher salt.
  6. Use a large cheese cloth or kitchen towel to wring out the excess water from the soy curls.
  7. In a large food container you can seal, add the soy curls and the cornstarch coating. Shake it up.
  8. Bring a large cast iron pan to medium heat and add the ¼ cup of vegetable oil. When hot, add the chopped ginger, garlic and the thinly sliced white parts of the scallions for about 2-3 minutes. Do not let anything turn brown as we will cook it more.
  9. When aromatic, add the sauce and cook for a few minutes on medium high (just a *little* above medium) for about 2-3 minutes until it’s slightly reduced and thickens a little. Make sure to stir especially if it bubbles up as to not burn the sauce. Don’t let it start to smoke. Once it reduces a little and thickens, add the soy curls and the diagonally cut green parts of the green onions and cook for another 3-4 minutes.
  10. Turn down the heat to medium and let the soy curls cook more as the sauce thickens even more about 3-4 minutes.
  11. Then one last time, turn heat up to medium high (for real this time), to char some of the soy curls if possible without burning the sauce for a literal hot minute. Use up to a few table spoons of water if needed to deglaze. Just make sure to season to taste with salt if you do this.
  12. Once all the soy curls are coated and you have a nice golden exterior, you are done! Sprinkly with toasted sesame seeds to garnish and serve.

Equipment

Image of large cast iron pan

large cast iron pan

Buy Now →

Notes

  • To reheat, best if refried in some vegetable oil in a cast iron. Last resort, just heat up in microwave for 30-45 seconds depending on power of microwave.

Did you make this recipe?

Share a photo and tag us — we can’t wait to see what you’ve made!

The Best and Easiest Pizza Sauce Recipe Ever – Vegan

July 26, 2021

Affiliate Disclosure: As an Amazon Associate, I earn from qualifying purchases. Thank you for supporting Bakeroise.

I’m back! My last post was for a Neapolitan-style pizza crust and this one is for homemade pizza sauce.

This seemingly pretty authentic recipe is adapted from Christina’s Cucina, a blog run by Christina, a Scottish-born Italian cook, whose mom is originally from just north of Naples, Italy. For anyone who knows, Naples is considered the birthplace of pizza so chances are, Christina is right that her mom makes amazing sauce. And I gotta tell you – I tried her recipe and wow. She is not playing around!

Christina emphasizes that the key to good pizza sauce is using high quality ingredients. To be clear, this isn’t snobbery. This is just her being realistic. And you know what else?

We aren’t even supposed to cook pizza sauce. She points that out in her post, where she posts a photo of cooking sauce and reiterates that that actually isn’t the pizza sauce as it is a misconceived notion that pizza sauce should be cooked prior to putting on the pizza.

This recipe is centered around good ingredients. While my local grocery store had some authentic canned tomatoes and supposedly good olive oil, it gave me an excuse to go to Providore Fine Foods, a pretty well-known foodie culinary playground store across town. I’m starting to miss going to the grocery store and if I was going to go, I wanted to go somewhere good.

Christina pointed out that the tomatoes must absolutely be Italian and who am I to argue? I found and purchased multiple canned Italian tomatoes but for this recipe, settled for this Strianese Brand one.

While I was at Providore, I kind of started rushing once I got to the olive oils because more and more people were entering the store. Honestly, being indoors with others still weirds me out a little bit so I grabbed one of the first olive oils I saw which was this Partanna Sicilian Extra Virgin Olive Oil. I tried a tiny bit of it and it was pretty peppery…but for this sauce? It was perfect.

The six ingredients I used are the canned San Marzano tomatoes, the good Italian olive oil, some dried oregano, my homegrown fresh Italian basil, my pantry kosher salt that I personally love and think is decent (no I didn’t use Maldon salt for this) and purple garlic.

Christina mentioned that while her family does use garlic in their pizza sauce, it isn’t common in many pizza sauces. But my family does love garlic so I chose to require garlic in this recipe.

Man, it’s so easy. To start, all you do is roughly mince your garlic , tear up your basil into small pieces – as small as you can without totally crumpling them up, and then add all the ingredients to a medium bowl.

Yes that looks pretty but that’s all going to be mixed up. This is pizza sauce remember? Next we crush and mix it all together.

Once we’re done, we spread it on the pizza dough evenly as possible (there will be some slightly chunky parts) but we are careful to not slather and soak the pizza as we don’t want it to be soggy.

Our sauce will look like this on our pizza after it has been cooked.

Pizza with homemade 6-ingredient pizza sauce, torn basil, charred sun-dried tomatoes, caramelized mushrooms and Mama Lils Peppers
Print

The Best and Easiest Pizza Sauce Recipe Ever

Print Recipe

Fool-proof, no-cook, 5-minute, 6-ingredient pizza sauce recipe that is adapted from an authentic Italian recipe from Christina’s Cucina.  Yields 4 cups or enough sauce for 8 10-inch pizzas.

  • Author: Jan Carlisle @ Bakeroise
  • Prep Time: 5
  • Total Time: 5
  • Yield: 4 cups – enough for 8 10-inch pizzas 1x
  • Category: Pizza
  • Cuisine: Italian

Ingredients

Scale
  • 28 oz or 800 grams canned Italian tomatoes that are actually from Italy
  • 6 tablespoons of high quality Sicilian extra virgin olive oil
  • 1 teaspoon of kosher salt
  • 6 fresh Italian basil leaves, torn into small pieces (do not crumple)
  • 2 cloves of purple garlic, roughly minced
  • 1 teaspoon of oregano

Instructions

  1. Mix everything well in a large bowl.
  2. If tomatoes are whole, make sure to crush along with the other ingredients.
  3. Pizza sauce is ready. When using, spread enough on pizza but not so much it becomes soggy.

Notes

  • This recipe yields 4 cups so almost more than enough sauce for 8 10-inch pizzas.
  • Store in fridge for 3-4 days.
  • Do not cook.

Did you make this recipe?

Share a photo and tag us — we can’t wait to see what you’ve made!

King Arthur Neapolitan-Style Pizza Crust Vegan Recipe

July 25, 2021

Affiliate Disclosure: As an Amazon Associate, I earn from qualifying purchases. Thank you for supporting Bakeroise.

Y’all. I can’t believe that I kinda sorta know how to make pizza dough now. I’m not necessarily a pizza snob but I do only have tolerance for “good” pizza and I would prefer to not eat cardboard.

The pizza dough recipe is adapted from King Arthur’s Neapolitan-Style Crust recipe and is split into two days – so it’s way more approachable for busy, overwhelmed mamas like me. I doubled the recipe as well so it makes four 10″ pizzas. I intentionally made this vegan by using organic cane sugar instead of the conventional sugar listed in the original recipe. That is important for me as I am vegan. But in general I have found King Arthur recipes to be good for baking novices like me.

Growing up, I was not exposed to “good pizza”. I was raised in the Bay Area and my immigrant family came from humble beginnings. So we would only go to pizza chains when it would be a “special” occasion. I grew up thinking Pizza Hut was the best pizza and then I discovered Little Caesars.

It’s what we had access to and what our family could afford. I was grateful I was even able to try it.

Then I graduated to independent pizza shops like Fat Slice in Berkeley after drunken show nights and then started really understanding good pizza when I tried out Arizmendi in Emeryville and Berkeley. I then moved to North Beach in San Francisco which is also called “Little Italy” and started trying out different kinds of pizzas in my neighborhood including Sicilian-style pizza at Golden Boy a few blocks from my Telegraph Hill apartment.

Once I started visiting New York to see family and friends, that was when I really discovered the new-to-me, hella good pizza in Brooklyn – Di Fara specifically. OMG. That was the best pizza ever to me. I haven’t been there in over a decade but I remember it being phenomenal and so worth the wait. For full disclosure, I have not been to Naples yet so some people might disqualify me for that but this recipe is supposed to be for a Neapolitan-Style crust!

Now I live in Portland, Oregon where we have some of the best pizza in the country (I admit I still think Brooklyn is better but who cares?). Yes. Even vegans can still like pizza. I don’t mind vegan cheese and to me, pizza is now about the crust, the sauce and the overall quality of the ingredients.

I served pizza using this crust to my family, including extended family (some who are picky and/or some who are real foodies) extended family loved it.

I have self-confidence when it comes to things but I’m humble enough to know that in general, I still have a lot to learn and practicing to do when it comes to working with dough in general (whether it’s breads, dumplings, empanadas, noodles, etc). I bow down to all the people from the cultures where the actual dishes are made that I am trying to recreate as respectfully as I can.

Anyway, the most important ingredient here is 00 flour, a superfine flour used for a chewy pizza crust.

This is a simple recipe that only has five ingredients: 00 pizza flour, warm water, active yeast (the original recipe says instant yeast is fine but I only tested using active yeast), organic cane sugar, kosher salt and warm water. I found that using a baking steel and wooden pizza peel to yield the best results.

This is pretty simple. We mix all the dry ingredients first so they are well combined. Then we add the water that’s between 100° and 110° and mix until just combined. Don’t overdo it.

We let the dough rest overnight, in a covered bowl, for at least 12 hours and up to 24 hours. This freed up my time to work on other stuff like making the pizza sauce, prepping the other toppings, etc.

For me, this was maybe 15 or 16 hours after I made it the night before. I mixed this up a bit more and added some 00 flour since it was a little sticky. Below is how it looked when I started to knead it and sprinkled more flour.

We flour a surface to avoid sticking and divide the dough into four pieces using a dough cutter. We don’t knead it the way we do vigorously with many breads. We simple take each piece and stretch out both ends and tuck underneath. Then we rotate and gently stretch out the other corners and tuck underneath. We place each dough ball in a floured bowl (in my case a casserole dish) and cover to rise for a second time – this time for only 45 minutes.

After 45 minutes, we are ready to shape our dough using our knuckles. There are animations here since I couldn’t photograph myself. I’ve been trying to use my knuckles for years to make dough and “letting gravity be my friend” (which is supposedly how you’re supposed to do it) but it actually takes practice and I gotta give props to all the people in the world who can do that. OMG. But yeah. We don’t quit. We TRY OUR BEST!

Once we get it so that it’s as close as we can to 10 inches in diameter even-if-it’s-not-a-super-perfect-circle, we put our sauce and toppings and bake this on a baking steel at 550° F in the oven with at least 8″ of clearance between the broiler and the pizza (to avoid fire).

This is how the pizza crust looks after baking!
Print

King Arthur’s Neapolitan-Style Pizza Crust Vegan Recipe

Print Recipe

This is a super easy, vegan pizza dough recipe adapted from King Arthur’s Neapolitan-Style Pizza Crust Recipe that yields 4 10-inch pizzas.

  • Author: Jan Carlisle @ Bakeroise

Ingredients

Scale
  • 4 cups or 464 grams of 00 Pizza Flour
  • ¼ teaspoon active dry yeast
  • 1 teaspoon organic cane sugar
  • 2 ½ teaspoons of kosher salt
  • 1 ½ cups or 340 grams lukewarm water at 105° to 115°F

Instructions

  1. In a large bowl, add and evenly mix all the dry ingredients. 
  2. Add the warm water and mix until just combined. Cover and let rise for 12-24 hours.
  3. After first rise, turn oven to 550°F and place pizza steel about 9-10 inches away from the broiler at the top. This preheats and the oven should be at the desired temperature of 550°F for at least half an hour before baking.
  4. Divide dough into four pieces, adding flour if needed to make less sticky.  
  5. On a floured surface, knead each dough ball by taking two ends of the ball and gently stretching it out before tucking it underneath. Rotate 90 degrees so that the other two corners are also stretched out and tucked underneath. Place seam side of the balls down in a well-floured bowl and cover. 
  6. Let dough balls rise a second time for 45-60 minutes . 
  7. Take one of the bowls of dough and place both knuckles underneath one of the balls to stretch into a 10″ pizza, being careful to not mess with the sides. Gravity will pull at the sides and naturally to shape the pizza while the knuckles remain in the center. 
  8. When pizza is shaped, add pizza sauce and desired toppings (except basil which I put on afterwards). Use a wooden pizza peel to transfer the pizza onto the preheated baking steel.
  9. Bake at 550° F in the oven on a baking steel at least 8 inches (for me it was 9 or 10 I believe) for safety for 6-7 minutes. While pizza is baking, repeat steps 7-8 for each pizza.
  10. Use floured pizza peel to remove from the oven and add basil upon removing pizza in the oven.
  11. Let cool enough to safely eat and serve.

Equipment

Image of pizza peel

pizza peel

Buy Now →
Image of pizza steel

pizza steel

Buy Now →

Notes

  • Using a baking steel and wooden pizza peel yields the best results
  • A sufficiently but not overly floured pizza peel helps with placing and removing the pizza from the oven.
  • Shaping the pizzas right before baking is best so that they don’t stick to anything.

Did you make this recipe?

Share a photo and tag us — we can’t wait to see what you’ve made!

Perfectly Golden Sesame Balls

July 23, 2021

Affiliate Disclosure: As an Amazon Associate, I earn from qualifying purchases. Thank you for supporting Bakeroise.

Here is recipe 2 of 2 for July’s 12 Months of Dim Sum project! Recipe 1 of 2 was for the Instant Pot Sweet Red Bean Paste here. Like I mentioned in my previous post for sweet red bean paste with adzuki beans, I have been eating Chinese food all my life. One of my favorite desserts ever is the famously addictive sesame ball – which is why I chose this Perfectly Golden Sesame Ball recipe as July’s main dim sum recipe!

Sesame balls are my perfect dessert except it’s hard to stop at just one! It’s big, round and perfectly golden on the outside which is covered with sesame seeds. When biting into the sesame ball, there’s a nice crunch and then it becomes so soft and hallow which is when you taste the filling – my favorite being adzuki bean paste! It feels like a true indulgence but without being too decadent. I’m bad at describing things but the closest thing I can think to is a donut hole (bad example I know), despite being fried, not being as heavy or overly sweet – depending on the filling inside the sesame ball. Ha! And speaking of doughnuts, the sesame ball has way more flavor than the Chinese doughnut that usually comes with congee at dim sum – which is a favorite of mine too don’t get me wrong…it just gets a little too heavy for me sometimes and I end up feeling sleepy afterwards!

Today’s perfectly golden sesame ball recipe is veganized and adapted from Tiffy Cooks. I chose to try her recipe because she posted a super cute picture of her mom and grandma and how can I say no to that?! There’s nothing better than when a grandchild shares a meaningful recipe and sweet narrative relating to the family. BTW, if any fellow bloggers are reading this, keep going with your personal narratives. I love them.

I did also take notes from the recipe of the people I personally consider to be The Royal Family of Food Blogging and omg they got me fantasizing about making a giant sesame ball in the future.

So how do we make these perfect golden sesame balls? Well here we go:

These perfect golden sesame balls are made with glutinous rice flour. For real, there is no negotiation or substitution. Glutinous rice flour or bust! I personally like this kind the best:

Just don’t even try to get regular rice flour, you will screw yourself. Get something that’s actually Asian. Take the time to track it down. Also, glutinous rice flour is also called sweet rice flour. But, again, it’s not the same as plain “rice flour” or “brown rice flour” even if it says “great for baking”. Do not be fooled. Glutinous rice flour only.

From top left clockwise: organic cane sugar, glutinous rice flour, just boiled hot water and raw sesame seeds. Pay attention. Do not try substituting any of these ingredients.

The sugar has to be organic cane sugar, of course, for it to be vegan.

Like I mentioned above, glutinous rice flour or nothing. Not rice flour. Not brown rice flour. No other random flours. Only glutinous rice flour which is also under the name of sweet rice flour.

The water absolutely has to be hot as well. So what I do is just boil enough in my kettle when I’m done gathering the other ingredients.

The sesame seeds can only be raw since the cooking method here is deep frying. Do not burn your sesame seeds. Make sure the seeds are raw! So no toasted sesame seeds please! Raw raw raw!

To start the process, put your sesame seeds to the side to avoid confusion.

First we are going to mix the sugar and glutinous flour. Do not mess this up because I did this during one of my batch tests by forgetting to add the sugar at this point. I didn’t realize until I’d already mixed the glutinous rice flour and hot water, rolled it, portioned it and shaped it into little bowls. I knew I was screwed but I decided to mash it all up together anyway and add the sugar with a little bit of water to help the dough become to workable.

Of course it didn’t work out. It messed with the dough so bad that the sesame balls turned out rock hard. So pay attention.

You will add your hot water to the organic cane sugar and glutinous rice flour and use chopsticks to mix. Add a tiny bit of glutinous rice flour if it’s too sticky or hot water if it’s too dry. Obviously add in small increments of either to not mess with the dough too much. Let it cool down and then shape it into a ball. You know..your usual dough ball that’s nice and springy. Not too dry or too sticky.

You’ll end up rolling it out into a stick and divide it into 8 balls. So the easiest way is to use a dough cutter and split it in the middle. Then split both halve in half and so on.

When we have our eight pieces, we will roll each piece into a ball and then shape them like little pinch pots but with a rounded bottom. The sides should be thin enough where you can still close the ball over the filling but not so thin to where it starts to look translucent. That’s too risky when deep frying. This is where the filling will go.

This next step is for the filling, if we choose to have filling. We’d need half a cup of filling to fill all 8 sesame balls. You will take a heaping half tablespoon of filling and add it to each ball. I tried doing more of an assembly line where I shape everything first but I found that shaping and filling each ball one at a time gave me better results. If anything was too dry though, I’d just add a little bit of water to help the dough be more workable.

Then we gently tuck the filling inside and pull the dough over the top like so.

I’m still working on neatness but really try to get the filling secure inside so it doesn’t spill out. After we seal the ball, gentle roll it to secure it. I’m looking at this and in retrospect that’s honestly kind of thick. I tend to do that with dough in general but I’m improving little by little. I guess I also do tend to like thicker doughs unless we’re talking about pizzas.

we then get we sesame seeds we set aside earlier in one little bowl. Then next to it we put our other little bowl of half a cup of water. This is our assembly line. One by one we gently roll each ball in water then cover it with sesame seeds. I personally found that putting each ball on the bed of seeds and then sprinkling the other parts made it easier for the seeds to stick as opposed to just rolling around it in the small bowl.

When done, the raw sesame balls should look like this.

Obviously, not ever single sesame seed is going to stick but just try your best!

We are going to fry these balls in a pot with a large bottom so we don’t have to do batches. If you have a smaller pot, then obviously you will have to do them in batches. I use about 4-5 inches of oil in my large 8 quart pot. Please be careful and do NOT have too much oil. Seriously that can cause a fire. Don’t do it.

There are two stages of frying but don’t worry. You don’t have to remove the sesame balls to transition or anything. Here we go:

First stage: We first fry the sesame balls at 300° until they float. Obviously when you add the sesame balls, the temperature will drop so feel free to adjust so that the temperature gets back up to 300°.

It took me about 5-6 minutes until it started to float. Throughout the whole process, we gently move the balls around so they don’t stick to the pan.

Second stage: We immediately turn up the heat to 350° and fry it for another 6-7 minutes until it’s a perfect light golden color, which is when we immediately remove them so they don’t burn. They still cook even after removing them so you don’t want that deep golden color while it’s still in the pot.

When our perfectly golden sesame balls really do look perfect, let them rest on a paper towel-lined plate.

When cool enough, serve!

12 Months of Dim Sum Recipes:

January 2021: Vegan Siomai

February 2021: Instant Pot Congee

March 2021: Vegan Potstickers with Ginger Scallion Tofu

April 2021: Crispy Golden Fried Tofu

May 2021: Toasted Cumin Scallion Pancakes

June 2021: Gluten-Free Asian Dipping Sauce

July 2021: Sweet Red Bean Paste and Perfectly Golden Sesame Balls

Print

Perfectly Golden Sesame Balls

Print Recipe

This is a straightforward, easy recipe for perfectly golden sesame balls.

  • Author: Jan Carlisle @ Bakeroise
  • Prep Time: 20
  • Cook Time: 15
  • Total Time: 35 minutes
  • Yield: 8 sesame balls 1x
  • Category: Dim Sum
  • Method: Deep frying
  • Cuisine: Chinese
  • Diet: Vegan

Ingredients

Scale
  • 1 ½  cups or 240 grams of glutinous rice flour
  • 2 ½ tablespoons of organic cane sugar
  • ½ cup and 1 tablespoon of just boiled water
  • ½ cup of plain, room temperature water for rolling sesame balls in
  • ¼ cup of raw white sesame seeds
  • ½ cup or 136 grams of filling such as sweet adzuki bean paste (organic store-bought or homemade)
  • Neutral frying oil such as vegetable oil, peanut oil, soybean oil, etc.

Instructions

  1. Mix the glutinous rice flour, organic cane sugar and hot water in a big bowl with chopsticks.
  2. Let it cool down and roll it into a nice ball. Springy enough when you touch. Not too sticky and not to dry. Adjust accordingly to get the right texture. Add tiny bits of glutinous rice flour if too wet or add tiny bits of water if too dry.
  3. Roll out into a log (dough doesn’t need to rest in the recipe) and split into 8 even pieces.
  4. Roll each piece of dough into a ball. If you are not using filling, skip to step 8.
  5. We are going to take the first ball and shape it.  To shape, make an indentation in the middle with your thumb and start working around the dough to make a wall with your other fingers as if you were making a pinch pot. Make the opening where your thumb is big enough to add a heaping half tablespoon of filling in each ball.
  6. We take a heaping half tablespoon of filling and put it in the sesame ball. Then we seal it and gently roll it around to secure the seal.
  7. We dip it in water and wet the whole ball. We place the wet sesame ball on a bed of the sesame seeds and toss more sesame seeds at the top (instead of rolling the sesame ball around).
  8. Repeat steps 5-7 for the rest of the sesame balls.
  9. Bring a large pot to medium heat and add neutral frying oil. When the temperature gets to 300°-310° (nothing higher!) fry the sesame balls at medium for 5-6 minutes or until the balls start to float. Keep the balls rolling so that they don’t stick to the pot.
  10. When the balls start to float, turn the heat to medium high or 350° (nothing over – be safe!) and fry until a light golden color. Do not fry until we get that perfect medium golden color or else the sesame balls will burn.
  11. When the balls are done, drain on a paper towel-lined plate.
  12. Let sesame balls cool before serving.

Notes

  • If any filling comes out of the sesame balls, immediately remove.
  • Reheat at 310° F in the oven for 5 minutes or 300° F in the convection oven for 4 minutes. Do not microwave or refry.
  • I am using an electronic induction range so my stuff heats at a faster and more powerful rate. Always check the temperature using a thermometer.

Did you make this recipe?

Share a photo and tag us — we can’t wait to see what you’ve made!

  • « Go to Previous Page
  • Page 1
  • Interim pages omitted …
  • Page 5
  • Page 6
  • Page 7
  • Page 8
  • Page 9
  • Interim pages omitted …
  • Page 16
  • Go to Next Page »

Primary Sidebar

Categories

Recent Recipes

  • Vegan Filipino Afritada Inspired Tomato Stew
  • Mulled Pear and Apple Cider
  • Bakery Style Chocolate Chip Cookies
  • Shortcut Vegan Bolognese
  • Kimchi Chickpea Bowl
  • Facebook
  • Twitter
  • Instagram
  • Pinterest

Calendar

June 2025
M T W T F S S
 1
2345678
9101112131415
16171819202122
23242526272829
30  
« Dec    

Archives

  • December 2023
  • November 2023
  • September 2023
  • September 2022
  • March 2022
  • February 2022
  • January 2022
  • December 2021
  • November 2021
  • October 2021
  • September 2021
  • August 2021
  • July 2021
  • June 2021
  • May 2021
  • April 2021
  • March 2021
  • February 2021
  • January 2021

Recent Comments

  • Jan on Vegan Longevity Noodles – Yī Miàn
  • Kim on Vegan Longevity Noodles – Yī Miàn
  • Jan on Vegan Mongolian Beef Inspired Soy Curls
  • Jenn P on Vegan Mongolian Beef Inspired Soy Curls
  • Jan on 10 Ingredient Vegan Siomai

Footer

↑ back to top

About

  • Privacy Policy
  • Disclaimer
  • Terms & Conditions

Newsletter

  • Sign Up! for emails and updates

Contact

  • Contact
  • FAQ

As an Amazon Associate I earn from qualifying purchases.

Copyright © 2020 Brunch Pro on the Brunch Pro Theme